Tuesday, December 17, 2019

Ruby Rock-It! It's The Most Wonderful Time Of The Year

Hello Again !!

I am super excited to be sharing some more festive fun! 
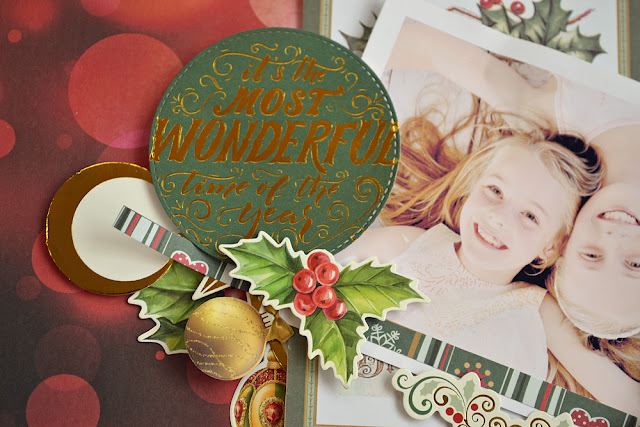
I have combined papers from CrafterChoice Nostalgic Treasures 12 x 12 Paper Pad with coordinating  Dic Cuts and  Gold Festive Pop Tags to create a sweet past Christmas memory of my girls. 

"It's The Most Wonderful Time Of The Year"
Ruby Rock-It ! Products:
Crafters Choice Nostalgic Treasures 12 x 12 Paper Pad, NOST70 Nostalgic Treasures Die Cut Pack, Festive Pop Tag Pack - Gold
Other:
Circle Die, Foam Tape, Adhesive

To Recreate:
Remove the white strip from the red  'Bokeh' style paper from the 12x12 Nostalgic Treasures Paper Pad. 
Select 3 x Bauble, 2 x Star Bauble and 1 x Snowman Tags from the Festive Pop Gold Tag Pack.
Arrange and attach in place.
Remove Christmas Greeting Sentiment form 12 x 12 Paper.
Position and attach over the tag elements. 
Attach photo on slight angle.
Remove a small strip from the edge of 12 x 12 paper
Trim down trip and attach over the bottom edge of the photo.
Remove It's The Most Wonderful Time of the Year Sentiment
Die Cut the sentiment with a circle die
 Attach over the bottom left hand edge of the photo
Add Nostalgic Treasures -  holly and bauble die cuts 
Layer more of the Nostalgic Treasures die cuts and Candy Cane Gold Tag element over the bottom right hand edge of the photo.  Attach with foam tape to add a little dimension.

Attach scroll die cut along the bottom edge of the photo 
Add hanging baubles 


Thanks so much for dropping by,
Merry Christmas and Happy Creating!


Thursday, December 5, 2019

Ruby Rock-it! Oh Deer


Hello Everyone!
Poppiug in today sharing some more Festive Pop fun for Ruby Rock-It!.
 This collection is so much fun.  I just love the bright colours and super cute imagining.  One certainly goes to a festive, happy place with Chirstmas Unicorns, Llama's and flamingo's.
 I can't believe that Christmas is nearly here!
Ruby Rock-It! Products:
Crafters Choice Festive Pop paper Pad, XPOP79 Festive Pop Die Cut Pack, XPOP86 Sticker Booklet, DIY Card Set
Other:
White Cardstock

To recreate:

Trim 2 x 0.75" x 12" strips from  different papers from the paper pad.
Trim 1 x 0.75" x 12" strip from one of the papers from the paper pad.
Position and attach strips in place to white cardstock - stagger the strips and trim the edges. 
Remove the backing from one of the card and attach on a slight angle over the paper strips.
Print photo and slip into decorative frame.  Arrange and attach in place.
Attach a llama diecut and sentiment sticker over the bottom right hand corner of the frame.   
Decorate the bottom left hand corner of the frame with diecut elements.
Slip he sleigh die cut  underneath the left hand edge of the frame.
 Layer some more of the die cut elements over the bottom right hand corner of the frame. 
 Add a sentiment sticker from the sticker book 
and sloth from the diecut pack.
 Attach in place 'oh deer christmas is here' sentiment from the sticker book.
 Thanks so much for dropping by,
Happy Creating! 

Friday, November 15, 2019

Ruby Rock-It!: Festive Pop Frame Cards

Hello Everyone!
Popping in today sharing some Festive Pop Fun!!
I LOVE the recently released Crafters Choice DIY Photo Frame Card Set - so much fun and a quick and easy way of personalising a festive message to friends and loved ones.
Ruby Rock-It! Products:
Crafters Choice Festive Pop DIY Photo Frame Card Set XPOP55, XPO86 Sticker Booklet, Festive Pop Die Cut Pack XPOP79

6"x4" sized photos slip perfectly into these Photo Frame Cards:
I printed a few random ones of my two girls
Embellish with coordinating Festive Pop Die Cuts and Stickers to personalise your festive greeting.
 Sleigh Die Cut and Santa Seasons Greeting Sticker Sentiment as shown
 Super cute llama die cut and happy holidays sentiment sticker:

 Christmas Foliage and Pink Star die cut with Merry Xmas Sentiment:

Thanks so much for dropping by,
Happy Creating,


Friday, November 1, 2019

Ruby Rock-It! Fancy Florals


Hello Again Everyone!
Happy first day on the month!!  Today I am sharing some more pretty floral inspiration from the new Bella Mini Theme releases - Fancy Floral and Free Spirit.  I have used the Bella! Free Spirit Bohemian paper for the background base and added lots of pretty fussy cut floral embellishing from Bella! Fancy Floral Blossom paper.
  
Ruby Rock-It! Products:
Bella! Fancy Floral PFF06 Blossom, Bella! Free Spirit FST651 Bohemian
Other:
White Gesso, Sentiment Sticker, Floral Stamp,Butterfly, Black Ink

To recreate:
Add some white gesso to the Bohemian paper - apply with a stiff piece of cardboard or old banking card. 
 Allow to dry.
 Randomly stamp with a floral stamp and black ink:
 Fussy cut some floral blooms from the the Blossom paper:
 Position and attach in place:
 Position and attach photo.
Fussy cut some smaller singular floral blooms and arrange around the photo edges:
Add a fussy cut butterfly for a touch of whimsy
Fussy cut a few more flowers from the Blossoms paper.
Layer over the top of some of the other flowers to add a little dimension - attach with foam tape/dots.
 Add sentiment sticker:
Thanks so much for dropping by,
Happy Creating!


Tuesday, October 15, 2019

Ruby Rock-It!: Bloom

Hello Everyone!
Today I am sharing some more inspiration created with the soon to be released Bella Mini Theme collections - Fancy Floral and Dance Queen. 
The Fancy Florals papers are perfect for adding pretty fussy cut embellishing to your paper crafting projects!
           Ruby Rock-It! Products:   
    Bella! Fancy Floral PFF06 Blossom, Bouquet,  Bella! Dance Queen On Pointe
Other:
Black Cardstock, Butterflies 

To recreate:
Trim a piece approximately 4" x 12" from the Dance Queen On Pointe paper.
Affix to the base cardstock -  approximately 2" in from the left hand side.
Fussy cut a few of the floral elements from the Fancy Floral papers.
Arrange floral elements around the side and bottom left hand edge of the smaller photo:
 Arrange a few more of the floral elements around the bottom right hand edge of the larger photo:
Layer some smaller floral elements over the top - attach with foam tape/dots to add dimension.
Add fussy cut butterflies (from my stash) - stamped butterfly images would also look lovely.
Thanks for dropping by,
Happy Creating!